
I Painted My Kitchen Cabinets and Only Wanted to Cry Twice
Let me start by saying this: I am not a painter.
I’m the person who buys painter’s tape and still ends up with paint on the ceiling. Who thinks “how hard can this be?” and then finds out. Who has a collection of half-finished projects that looked great in my head.
So when I decided to paint my kitchen cabinets, even I knew I was in over my head.
But here’s the thing. My kitchen was dark. Those oak cabinets from the 90s? Yeah, they were there. Heavy, orange-y, making the whole room feel smaller and older than it actually was. I couldn’t afford new cabinets. Couldn’t afford a full remodel. But I could afford paint.
So I did it. Took me a whole weekend. Made mistakes. Learned things. And when it was done, I walked into my kitchen and actually gasped.
It looked like a different room.
If I can do this, you absolutely can. But learn from my mistakes so you don’t have to make them yourself.
First, Decide If You’re Really Ready
Painting cabinets isn’t like painting a wall.
It’s more steps. More drying time. More opportunities for things to go wrong. Your kitchen will be unusable for days. You’ll be eating takeout and washing dishes in the bathroom sink.
I’m not saying this to scare you off. I’m saying it so you go in with eyes open.
If you’re still reading, you’re probably ready.
Step 1: Gather Your Stuff (Don’t Skimp Here)
You’ll need more than just paint.
The list:
- High-quality cabinet paint (this matters—regular wall paint will peel)
- Primer (stain-blocking kind)
- Sandpaper (medium and fine grit)
- Sanding block or orbital sander (your arms will thank you)
- Paintbrushes (good ones, not the cheap pack)
- Foam rollers (for smooth finishes)
- Painter’s tape
- Screwdriver (for removing hardware)
- Drop cloths (to protect everything)
- Tack cloth (for wiping dust)
- Labels and a marker (trust me on this)
Don’t cheap out on paint. Cabinet paint is formulated to harden and resist chips and grease. I used regular paint my first time on a test piece and it stayed sticky for days. Learn from me.
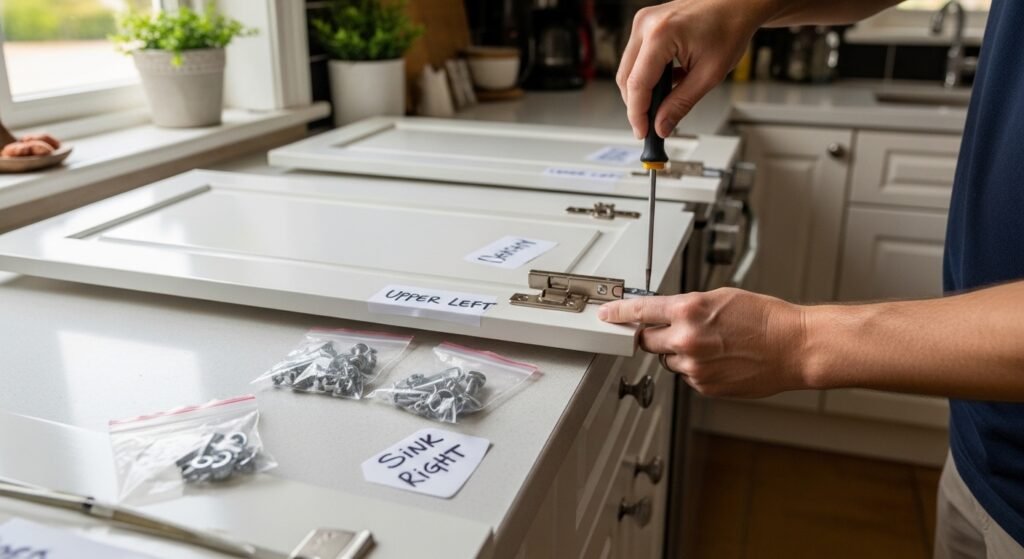
Step 2: Remove Everything You Can
This part is tedious but necessary.
Take off the cabinet doors. All of them. Remove drawers too.
Take off all the hardware—knobs, handles, hinges. Put them in a bag or container so they don’t disappear.
Here’s the pro tip I wish I’d known:
Label everything.
I put masking tape on each door and wrote where it goes. “Upper left.” “Below sink.” “Pantry right.” Then I did the same for the hardware bags.
When it was time to put everything back, I didn’t have to guess or try twenty doors to find the right fit. Worth the extra five minutes.
Step 3: Clean Like Your Paint Depends On It
Because it does.
Kitchen cabinets are greasy. Even if they look clean, there’s a film of cooking residue that paint will hate.
I used a degreaser and warm soapy water. Scrubbed every surface—doors, frames, drawers. Rinsed. Dried.
Then I did it again because I’m paranoid.
If you skip this step, your paint might peel later. Don’t skip it.
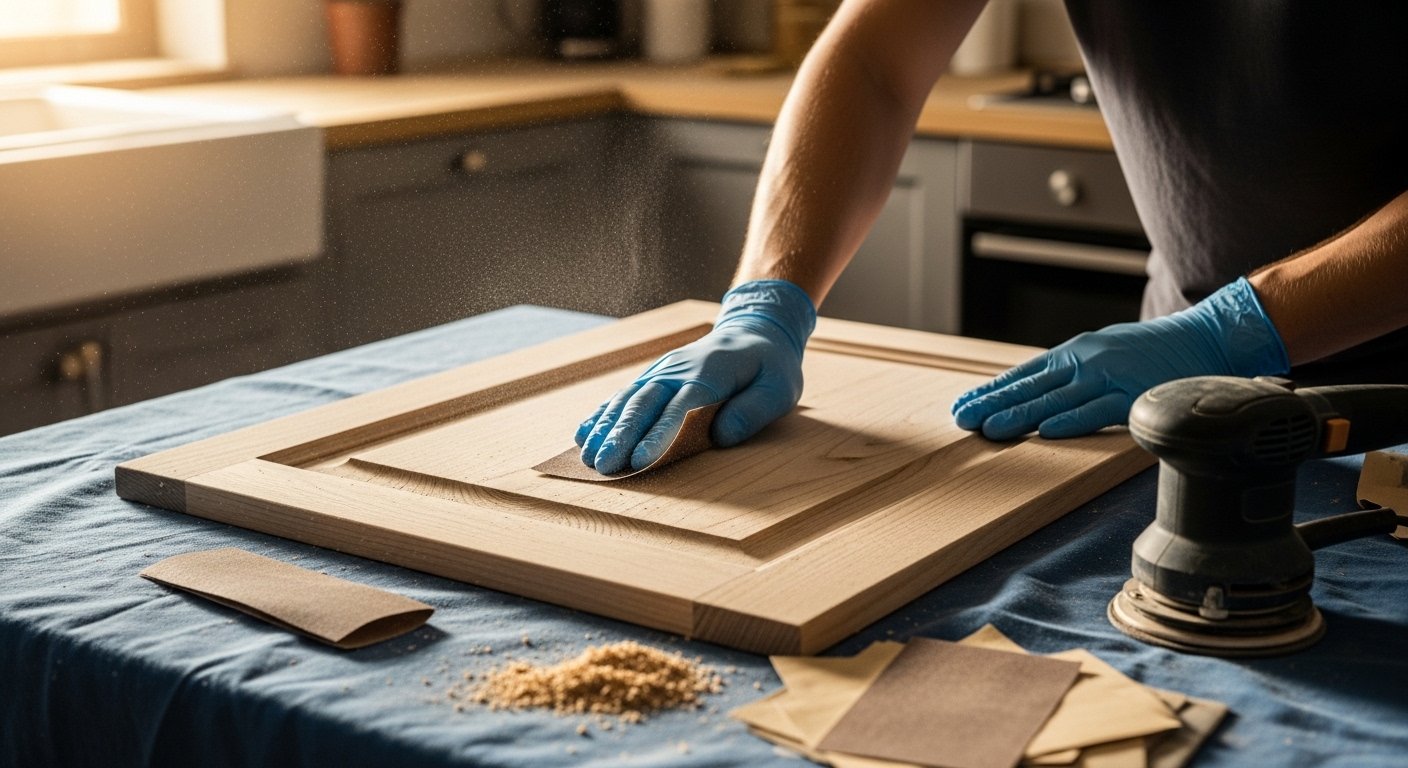
Step 4: Sanding Sucks But You Have to Do It
Sanding is my least favorite part of any project. It’s dusty, boring, and feels like it takes forever.
But paint needs something to grip. Shiny surfaces reject paint. Dull, scuffed surfaces accept it.
I used medium-grit sandpaper first to rough everything up, then fine-grit to smooth it out. If you have an orbital sander, this is the time to use it. If not, your arms will get a workout.
After sanding, wipe everything with a tack cloth. Those sticky cloths pick up dust that would otherwise ruin your finish.
Then wipe again with a damp cloth. Let dry completely.
Step 5: Prime Time
Primer is not optional.
It blocks stains, helps paint stick, and gives you a uniform base. If you’re painting dark cabinets light, you definitely need it.
I used a stain-blocking primer because my oak cabinets had tannins that could bleed through. Brushed it on edges and detailed areas, rolled it on flat surfaces.
Let it dry completely. Overnight if you can. I’m impatient and tried to rush once. The paint pulled up in spots and I had to restart. Don’t be like me.
Step 6: Actually Painting
This is where it starts to feel real.
Use thin coats.
I cannot stress this enough. Thin coats dry faster, don’t drip, and look smoother. Thick coats are a disaster—drips, uneven texture, takes forever to dry.
I did two thin coats. Some people need three. Go by how it looks, not by a number.
Brush the edges, roll the flats.
A good angled brush gets into corners and details. A foam roller gives flat surfaces that smooth, spray-painted look.
Let each coat dry completely.
Follow the paint can instructions. Don’t rush. I painted in the morning, waited, painted again in the afternoon. Next day, same thing.
Step 7: Patience While Drying
This is the hardest part.
The paint might feel dry to touch in a few hours, but it’s not fully cured. Cabinet paint needs time to harden. If you reattach doors and start using them too soon, you’ll get dents and marks.
I waited a full 48 hours before reassembling. Probably overkill, but my cabinets still look great years later.
Step 8: Put Everything Back
Reattach hinges to doors. Screw them back into place. Add knobs and pulls.
If you labeled everything like I suggested, this is easy. If you didn’t, enjoy the puzzle.
Check alignment as you go. Some hinges have adjustments. Don’t force anything—just tweak until doors hang straight.
Step 9: Admire Your Work
Stand back. Look at your kitchen.
That dark, dated space? Now it’s bright. Clean. Modern. You did that.
I stood in my kitchen for probably ten minutes just staring. Couldn’t believe the difference. Every time I walked in for the next week, I’d stop and smile.
What I Learned
It’s more work than you think. Everything takes longer—sanding, drying, painting, drying again. Plan for a weekend minimum, maybe longer if your kitchen is big.
Quality materials matter. Cheap paint shows. Cheap brushes leave streaks. Spend a little more.
Prep is everything. The actual painting is the easy part. Cleaning, sanding, taping, priming—that’s where the magic happens.
You will make mistakes. I dripped paint on a cabinet frame. I forgot to sand one door enough and had to redo it. I got tape stuck in a weird place. None of it ruined the project. Fix and move on.
The Result
My kitchen went from something I tolerated to something I love.
Cooking feels different in a space that looks good. Friends comment on it. The whole room feels bigger and brighter.
All for the cost of paint and supplies. Way less than new cabinets. Way less than a remodel.
If you’re thinking about it, do it. Just go in prepared, take your time, and remember—even with mistakes, it’ll still look better than it did before.
What about you?
Ever painted cabinets? Thinking about it? Got questions about something I didn’t cover?
Drop a comment and let me know. I read them all and I’m happy to help if I can.
And if this was useful, share it with someone who’s been staring at their kitchen thinking “I wish this looked different.” Today could be the day they start. 🎨🏡